PCB test accurate manual programming of FT100
|
||
| Printer Friendly Version | |
|
Application Note 115
PCB test accurate manual programming of FT100 |
| Printer Friendly Version | |
| On
fine pitch PCBs where you have no access to CAD data
there are some important steps to take to ensure accurate
and repeatable test programming. Programming the FT100 manually is easy but you do need to take care to program in co ordinates accurately when you are programming fine pitch components. As a guide 0.65mm components are easy to program, 0.5mm needs a little care and you need to take your time and ensure you position very carefully on 0.4mm parts. We do not recommend using the FT100 on the pads of 0.3mm pitch parts as any component placement misalignment on this pitch of part will cause test results to be unrepeatable. |
|
|
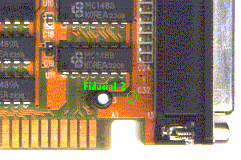
First when programming
a new board take care to select fiducial points which are
easy to align with. Either use points which are designed
as fiducials, or on older boards use a 90 degree corner
of a pad or track.
|
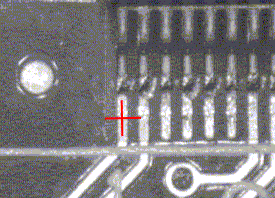 |
When programming fine
pitch components ensure you align the crosshair on the
centre of the pin: Do this by counting the steps from left to right across the component pad, say there are 8 machine steps, then go 4 steps back to the centre then SAVE. |
| How
do I determine the number of pins on a large QFP? Use the Determine Pitch and Pincount to help you count the number of pins per side of large PLCCs and QFPs, How? When you use this utility it helps to position the camera crosshair on the edge of component pads, rather than the centre, as it is easier for the eye to discriminate an edge than a centre position. Use care when you do this as some standard ICs have pitches which are extremely close e.g. 0.65mm is similar but not the same as 0.025". When counting pins with the Determine Pitch and Pincount utility you first need to align the crosshair with the left hand edge of the first pad on one side of the IC, then press Start, next move to the left hand side of the fourth pad and press Set Pitch, then move the crosshair to the left hand side of the last pad on the same side of the IC, the number of pins will be displayed. To check you have set up correctly press Verify and the FT100 will step back the correct number of pins one by one. If correct the crosshair should align with each pin in turn and return to the left hand edge of pin 1. If the crosshair overshoots by about 1 pin or stops short by one pin you have not set the pitch accurately enough. Don't worry it does take a little practice especially on 0.65mm /0.025" parts as the pitches are so close. What is the Snap to check box for? Always check this box if you are counting pins on standard ICs. The FT100 contains a database of standard IC pitches; when you use the determine pitch and pincount utility checking this box forces the FT100 to select the standard pitch closest to your measurement. Any slight error in your alignment will then be compensated for. Only turn this off if you are unable to count pins accurately on a standard pitch setting . Summary On fine pitch PCBs accurate and repeatable manual programming is easily achievable; to make sure you produce test programs of the highest quality please remember to note:
If you have any suggestions about how you obtained the best performance from your FT100 please email us at mail@polarinstruments.com |
|
Polar Instruments Ltd polarinstruments.com Tel: +44 1481 253081 Fax: +44 1481 252476 © Polar Instruments 2002 |
 |
| © Polar Instruments 2002. Polar Instruments pursues a policy of continuous improvement. The specifications in this document may therefore be changed without notice. All trademarks recognised. | |